Story Creator: Make AI Anime and Live-Action Episodes on Flixly
Flixly Story Creator turns a one-paragraph idea into a finished anime or live-action episode. It writes the script for free, keeps characters consistent, draws and animates every scene with dialogue, and assembles the clips into one video. Here are two original episodes made with it, step by step.
TL;DR
Story Creator, formerly Anime Creator, is Flixly's AI episode maker for anime and photorealistic live action. Describe a story and up to five characters, get a free scene-by-scene script, lock each character's look with a reference or identity sheet, render keyframes, animate them with spoken or exact dialogue, and assemble one episode. Two original example episodes show every step.
Flixly Story Creator is an AI story video maker that turns a one-paragraph idea into a finished, multi-scene episode, in anime or in photorealistic live action. It writes the script for free, keeps your characters looking the same from shot to shot, draws a keyframe for every scene, animates each one with dialogue, and joins the clips into a single video. Open Story Creator to start your first episode.
This guide makes two original episodes from scratch, one anime and one live action, and shows every step with real screenshots and the unedited output.
Watch the anime episode
The Lantern Keeper of Kiriyama was made in Story Creator from one short paragraph and two character descriptions. Nothing below was drawn or edited by hand: the script, the character sheets, the six keyframes, the animation and the spoken dialogue all came out of Story Creator, and the clips were assembled into one video in the same tool.
Settings: Anime, Modern look, Landscape 16:9, Drama, Balanced dialogue, Nano Banana 2.1 by Google for keyframes, Seedance 2.0 Fast by ByteDance for animation. Six shots, 1 minute 15 seconds.
What is Story Creator?
Story Creator is Flixly's episode maker for anime and live-action AI video. You describe a story; it plans the episode as a storyboard of scenes, each with a written shot description, camera direction and lines of dialogue. You then render a keyframe for each scene, approve or redraw it, animate it into a clip, and assemble the clips into one episode.
It used to be called Anime Creator. It was renamed because it now makes photorealistic series as well, with the same workflow.
| Story Creator on Flixly | |
|---|---|
| Visual modes | Anime (six looks) or photorealistic live action |
| Input | A title, a genre, a short story, and up to five characters |
| Script | Written for you, free, with a scene breakdown and dialogue |
| Runtime | A 6-scene short draft, 0:30, 1:00, 2:00, 3:00 or a custom length |
| Formats | Landscape 16:9, vertical 9:16 or square 1:1 |
| Keyframe models | Nano Banana 2.1, Nano Banana Pro and Nano Banana 2 from Google; GPT Image 2, GPT Image 2.5 Sunburst and Flare from OpenAI |
| Animation models | Seedance 2.0, 2.0 Fast, 2.0 Mini and 2.5 from ByteDance; Kling 3.0 and 3.0 Turbo from Kuaishou; MiniMax H3, H3 Max and H3 Max Turbo; Wan 2.7 and 3.0 from Alibaba |
| Dialogue | Spoken by the video model, or exact lines voiced by text-to-speech |
| Output | One assembled episode, plus every keyframe and clip |
Anime or live action: the two visual modes
Anime draws the episode in one of six looks: Modern (crisp digital cel shading), Shonen (bold outlines, high contrast), Shojo (soft pastels), Seinen (muted and detailed), Retro 90s (film grain, painted backgrounds) and Chibi. Each character gets a generated reference sheet, and the video model speaks the dialogue itself, in the same pass as the animation.
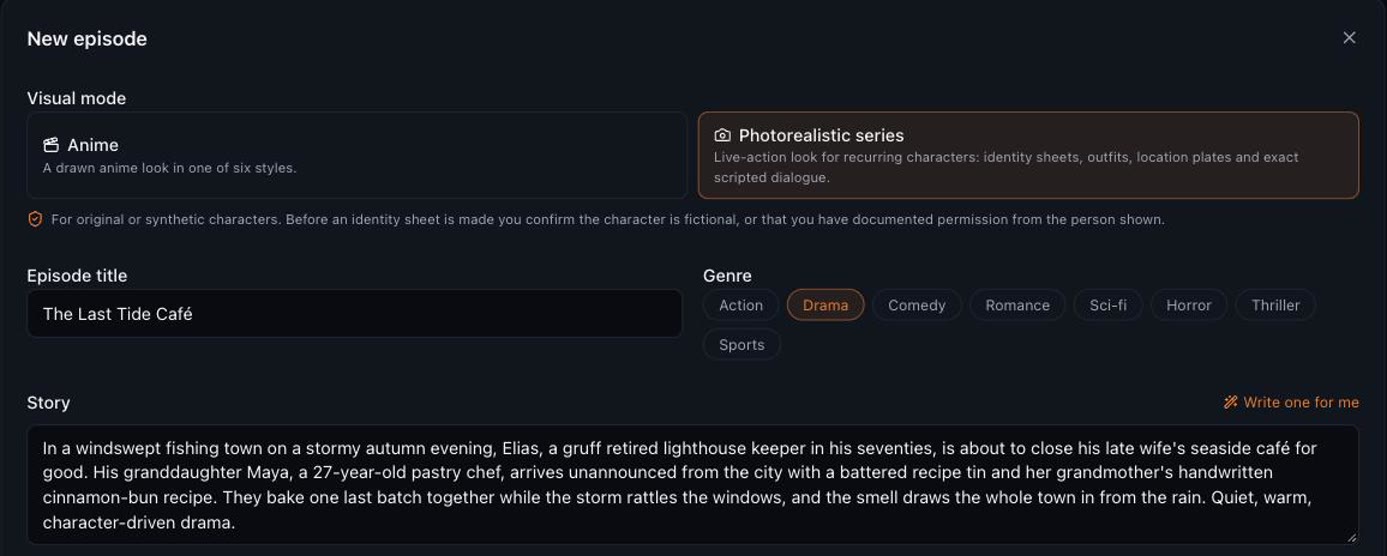
Photorealistic series gives the episode a live-action look for recurring characters. Each character gets a six-view identity sheet made from an approved image, and the dialogue is voiced word for word by text-to-speech and laid over the clip. It is built for original or synthetic characters: before an identity sheet is made, you confirm the character is fictional, or that you have documented permission from the person shown.
How to make an AI anime episode, step by step
1. Describe the story
Open Story Creator and choose New episode. Pick the visual mode, give the episode a title, choose a genre, and write the story in a few sentences: who it is about, what they want, what stands in the way, and how it ends. If you are stuck, Write one for me drafts an idea. Then choose a look and a format.
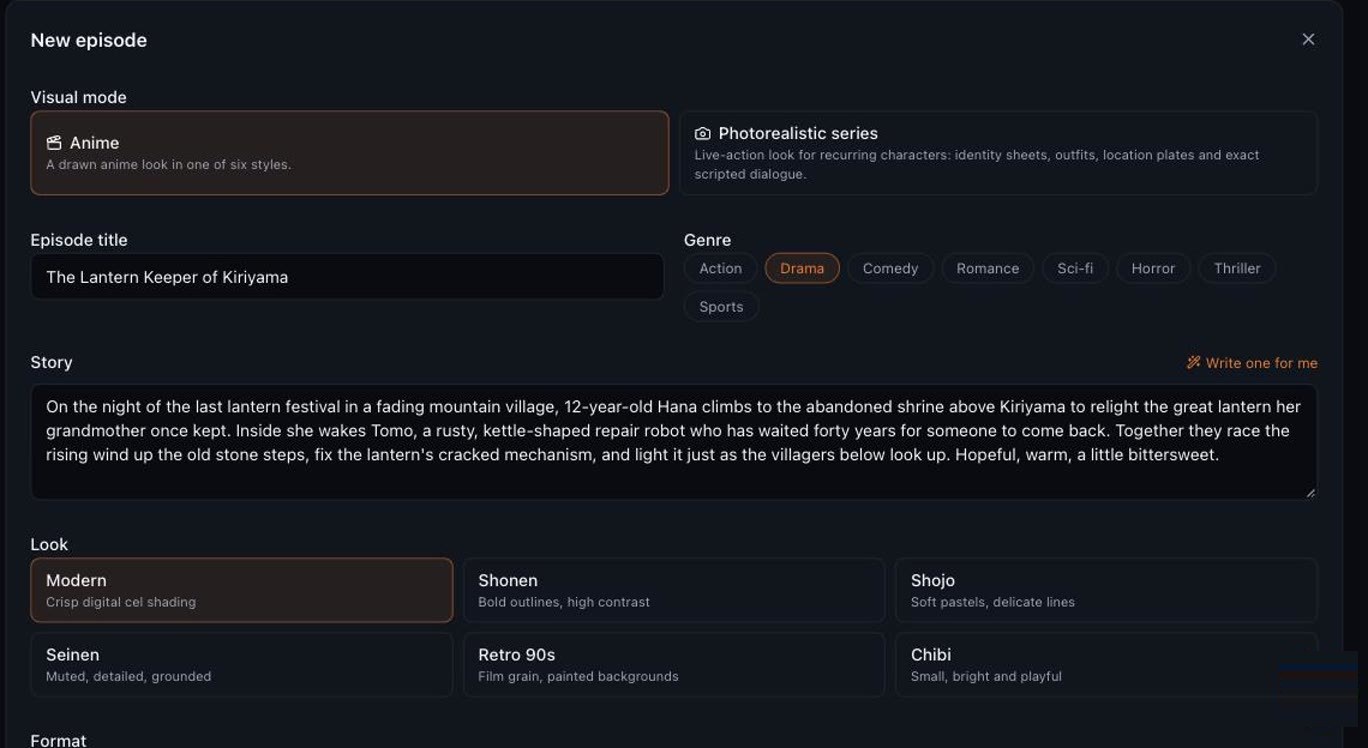
The story used for this episode:
On the night of the last lantern festival in a fading mountain village, 12-year-old Hana climbs to the abandoned shrine above Kiriyama to relight the great lantern her grandmother once kept. Inside she wakes Tomo, a rusty, kettle-shaped repair robot who has waited forty years for someone to come back. Together they race the rising wind up the old stone steps, fix the lantern's cracked mechanism, and light it just as the villagers below look up. Hopeful, warm, a little bittersweet.
2. Pick the keyframe and animation models
The keyframe model draws each scene; the animation model brings it to life. The cards show the live price for each choice and whether the model speaks dialogue. Models marked "No audio" make silent clips, and their lines can be added as a voice-over instead. You can change either model later for the whole episode or for a single shot.
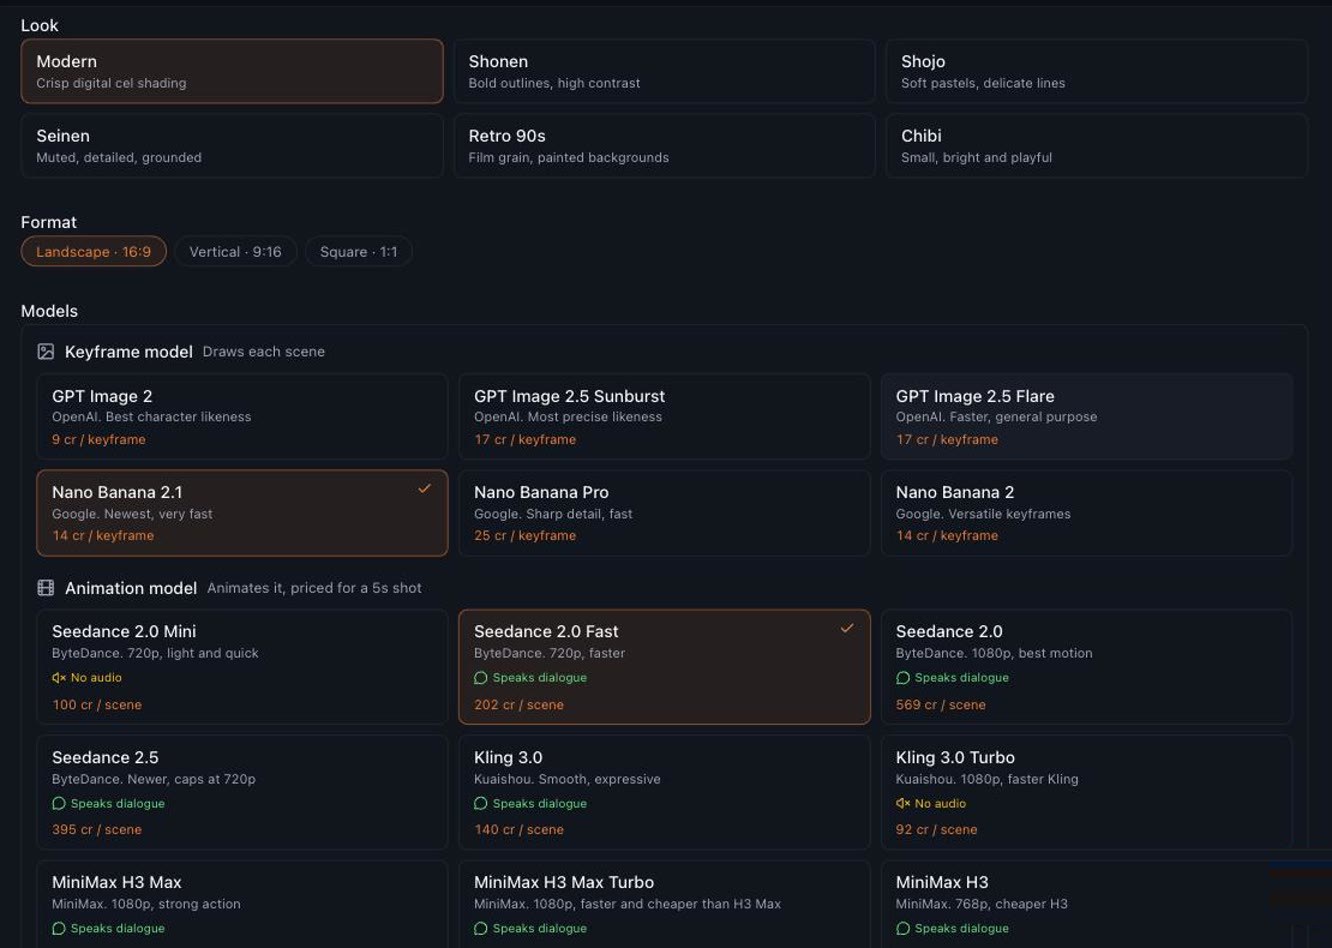
3. Set the runtime, the dialogue and the cast
Choose a target runtime and how much the characters talk: Light, Balanced, Conversational, or Automatic to let the script writer decide. Then add up to five characters with a short visual description. The description is what keeps a face, a hairstyle and an outfit consistent across scenes, so name the details that make the character recognisable.
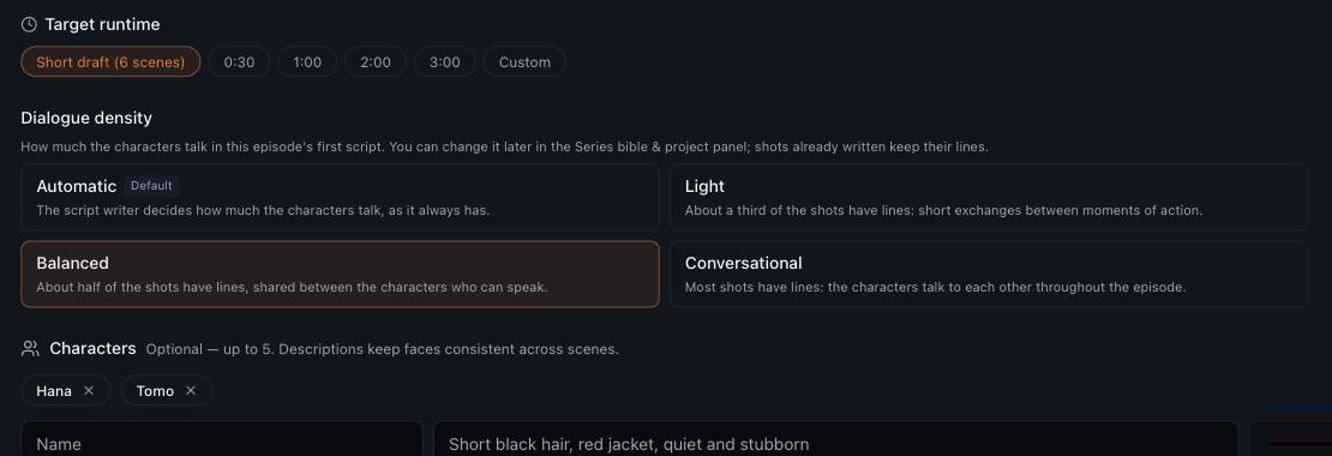
4. Get the free script and check it
Create and write the script turns the story into scenes. Writing the script costs nothing; you only pay for what you render. The Script check then counts the lines per character, estimates how long the dialogue runs, and warns you when one character does most of the talking, before anything is rendered.
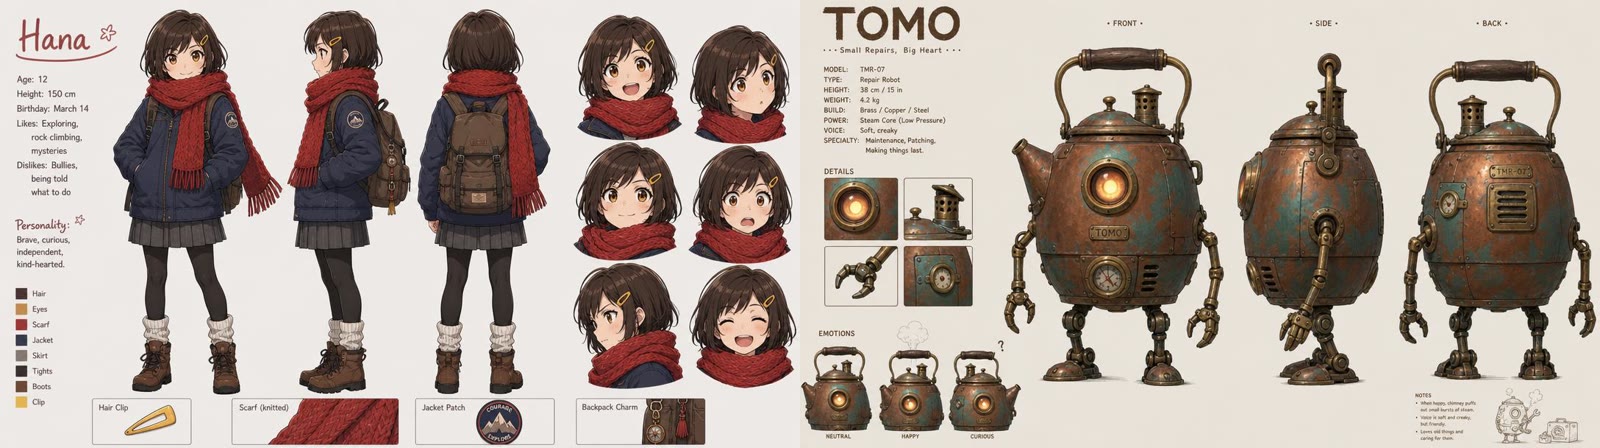
5. Lock each character's identity
Generate a reference sheet for each character and set it as Canonical. From then on, every keyframe is drawn with that exact image, which is how Hana keeps her yellow hair clip and red scarf in all six scenes.
6. Render the keyframes
Render keyframes draws the opening frame of every scene. Approve the ones you like and redraw the rest; nothing is animated until you say so. Here are the six keyframes Nano Banana 2.1 drew for this episode, with both characters held consistent from the forest steps to the village square:
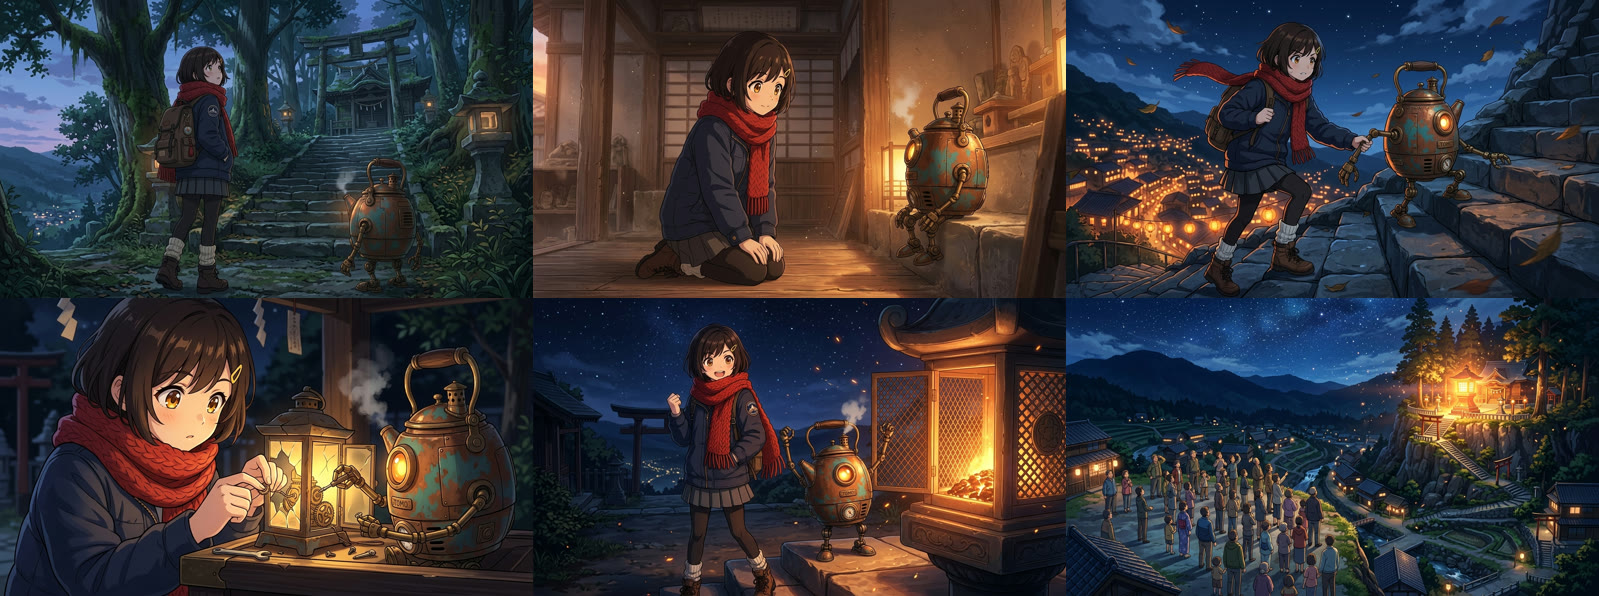
Each scene has its own panel with the keyframe, its takes, and the prompt inputs that went into it:
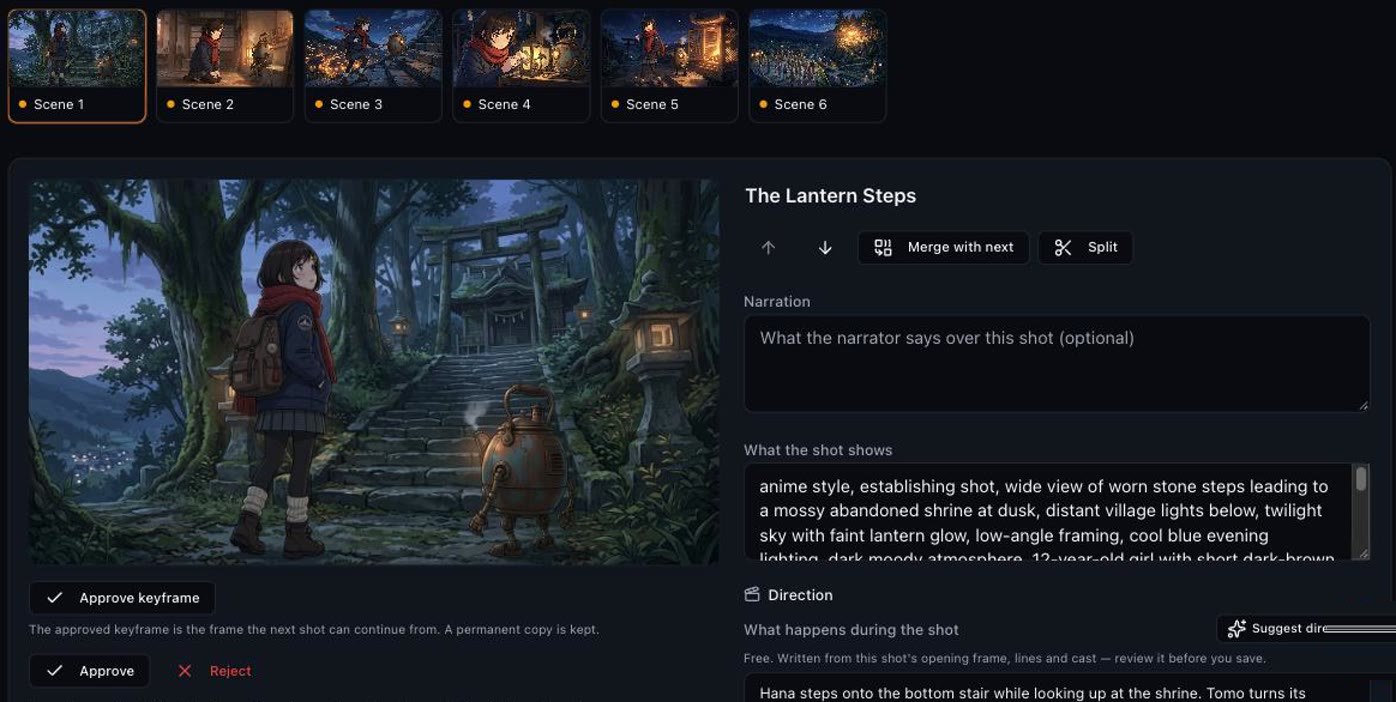
7. Direct each shot
Every shot has its own controls: What the shot shows sets the keyframe, Direction says what happens during the shot, and you can set the framing, camera movement, lighting, shot length, cast and dialogue. Suggest direction writes a direction from the keyframe and the lines for free, for you to review.
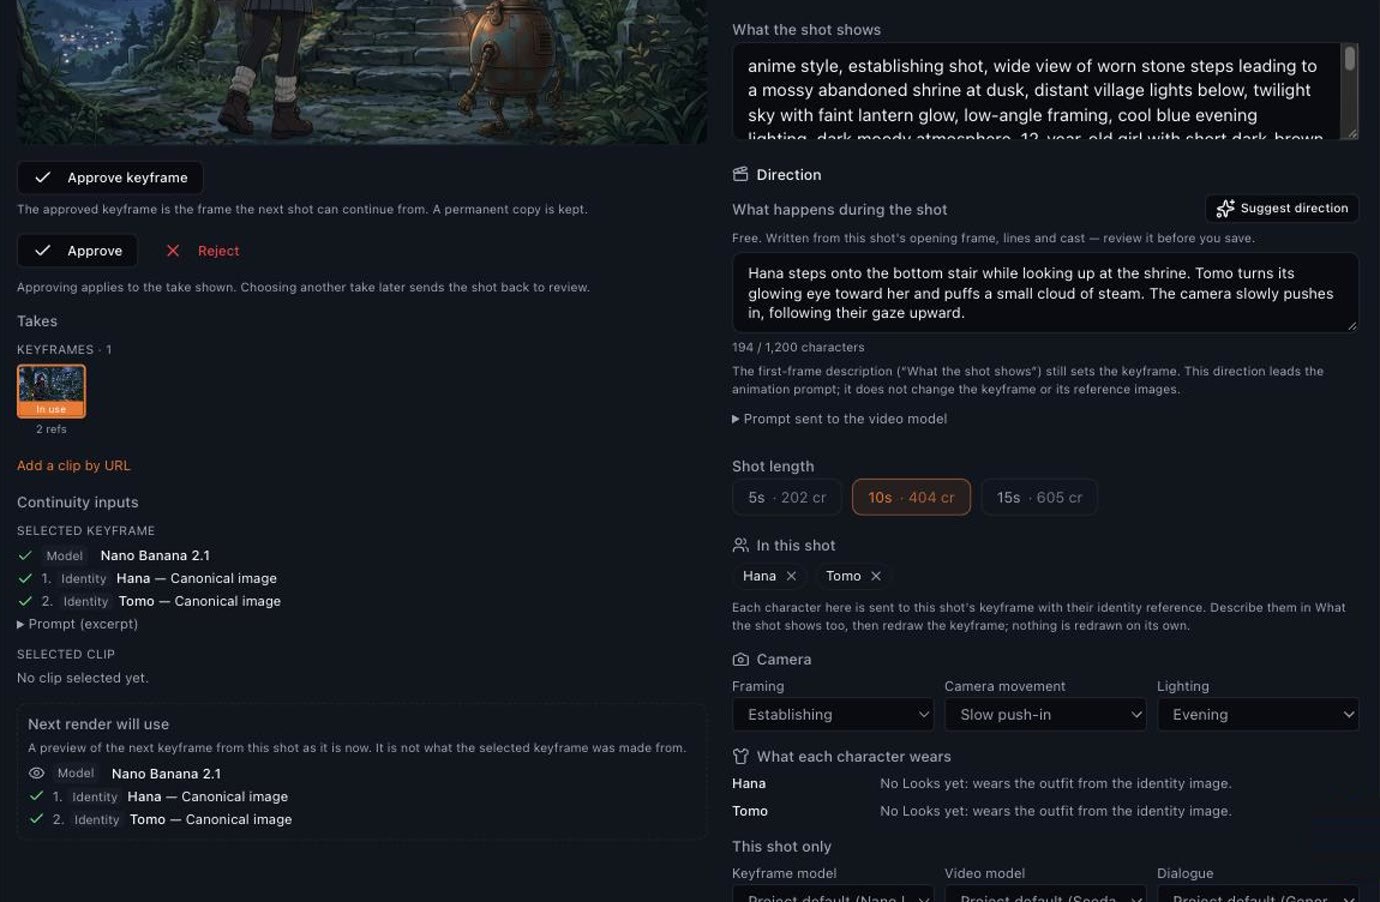
8. Animate the scenes
Animate scenes sends every approved keyframe to the animation model. In anime mode the video model voices the lines itself, so the characters speak in the same pass as the motion. Here is scene 2 on its own, with the dialogue the video model spoke:
The scripted lines for this shot were "You were waiting here?", "Forty years, little one." and "Grandma told me about you." A speaking video model can change words, so Check spoken words compares a take with the script for free before you approve it.
9. Assemble the episode
Approve the clips you want to keep and choose Assemble episode. Story Creator joins each scene's selected clip, with its sound, into one video you can download.
The live-action version: The Last Tide Café
The same workflow in Photorealistic series mode made The Last Tide Café: a retired lighthouse keeper, Elias, and his granddaughter Maya bake one last batch of cinnamon buns in his late wife's seaside café during a storm. Both characters are fictional.
Identity sheets keep a real-looking face consistent
In live action, a character starts from one approved image. Story Creator then draws a six-view identity sheet from it, front, three-quarter, side, back, face and expressions, and once you approve it, every keyframe takes the character's identity from that sheet.
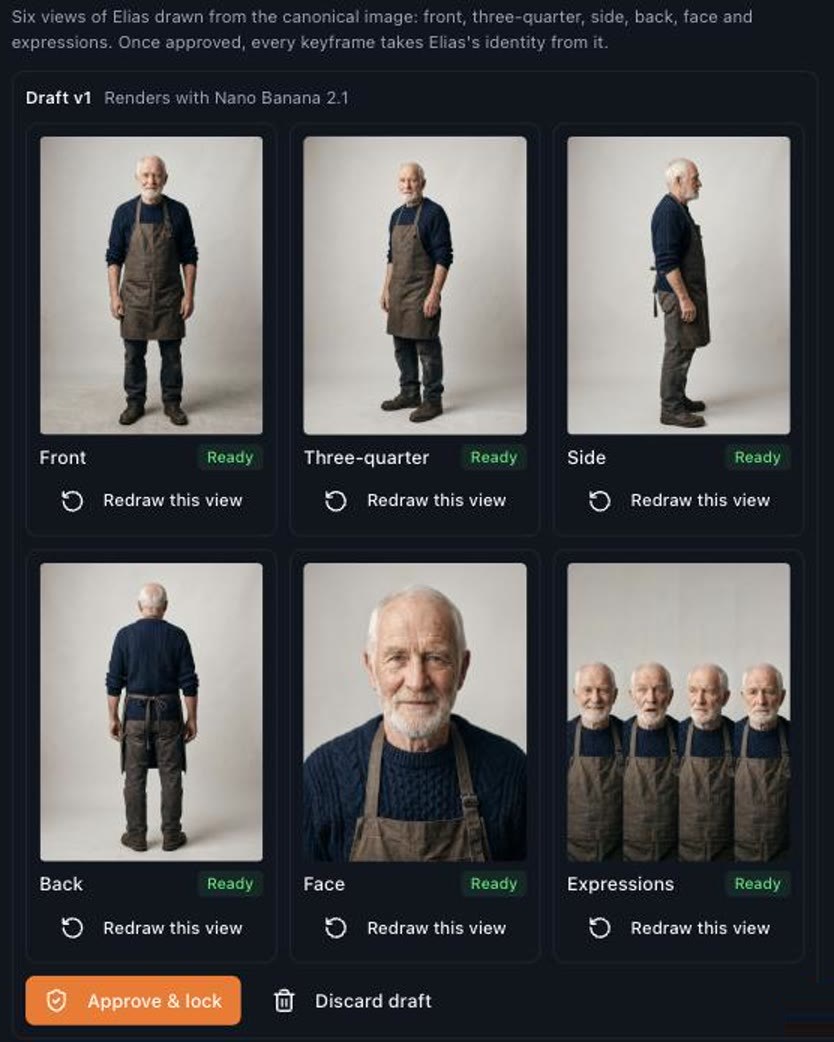
The storyboard and the result
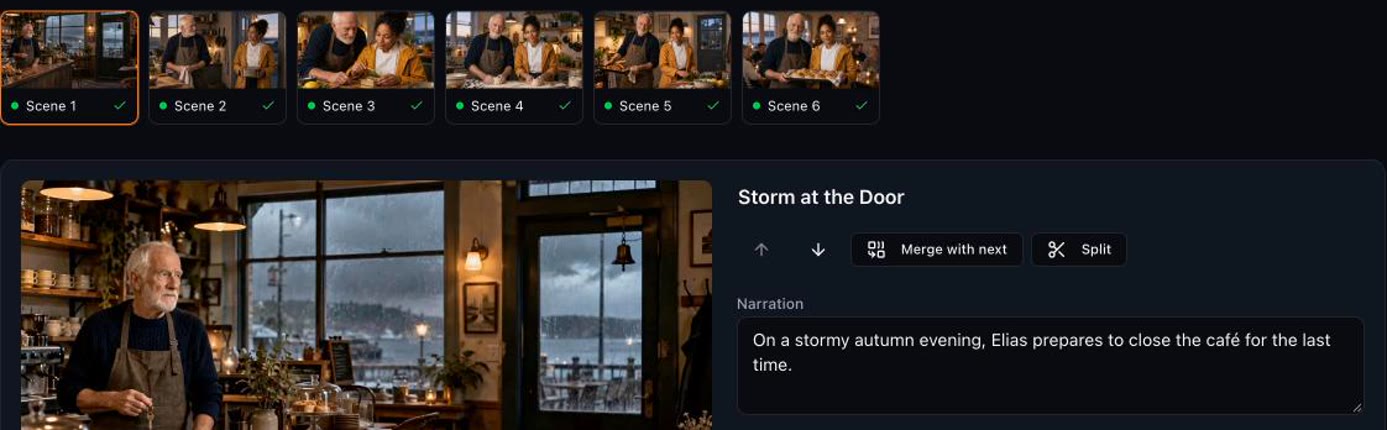
Settings: Photorealistic series, Landscape 16:9, Drama, Balanced dialogue, GPT Image 2.5 Sunburst by OpenAI for the keyframes, MiniMax H3 Max at 1080p for animation. Six shots, 55 seconds.
Here the dialogue is generative speech: MiniMax H3 Max speaks the lines inside the clip, in the same pass as the picture, so the voices, breathing and room sound belong to the shot. If every word has to be verbatim, switch the episode or a single shot to Exact lines instead.
Our first live-action take, and what we changed
The first version of this episode used Nano Banana 2.1 keyframes, Seedance 2.0 Fast and exact lines voiced by text-to-speech. It worked, but the frames had a glossy, generated look and the separately voiced lines sat on top of the picture. Two changes fixed it, and neither needed a new script or new identity sheets:
- A keyframe model built for likeness. Under Video model, the keyframe model was switched to GPT Image 2.5 Sunburst and each scene got a New keyframe. The identity sheets stayed as they were.
- A video model that speaks. The animation model was switched to MiniMax H3 Max, and in Series bible & project the dialogue delivery was set to Generative speech by the video model. Then each shot was Re-animated.
That is the general rule for live action: pick a photographic keyframe model, and let a speaking video model voice the lines unless you need them word for word.
How dialogue works
Story Creator gives you two ways to voice a script:
- Generative speech. The video model speaks the lines in the same pass as the animation, with its own voice and timing. It sounds the most natural and needs no extra step, but it may paraphrase, drop or add words. This is the default for anime, and the one we recommend for live action too.
- Exact lines. Each line is voiced by text-to-speech in the character's voice and laid over the clip, word for word. Use it when every word matters, such as product names or lessons. New live-action episodes start on this setting.
There is no lip sync. Lip-sync models are trained on real faces; on anime characters they fail to find the face or repaint the mouth over the drawing, so Story Creator has the animation model speak the lines instead.
Tips for consistent characters
- Describe what makes a character recognisable. Hair shape and colour, eye colour, one signature item of clothing and a silhouette do more than adjectives like "beautiful".
- Lock a canonical image before you render keyframes. Every keyframe then sends that exact image for the character.
- Keep the cast of each shot honest. The characters listed under "In this shot" are the ones sent with their reference; describe them in the shot too.
- Redraw a keyframe, not the episode. If one scene drifts, redraw just that keyframe before you animate it.
- Approve before you animate. Animation is the expensive step, so settle each keyframe first.
What it costs
Writing the script is free. You pay for what you render: each keyframe, each animated shot (priced by the animation model and the shot length), and voice-over lines in exact-lines mode. The Episode estimate shows what is left to generate for the whole episode before you start, and each render is charged its own quote when it begins.
Story Creator or another Flixly tool?
- Story Creator is for a story with characters and scenes, in anime or live action.
- The Long Video Generator chains shots into one continuous video when you want a single long take rather than an episode of scenes.
- The Manga Creator makes manga, manhwa and manhua chapters as still panels instead of video.
- The Video Generator makes a single clip from a prompt or an image.
For more anime-specific detail, read the first-scene walkthrough, the character-consistency checklist, and the AI Anime Creator overview.
Try it
Write a paragraph, add your characters, and get the script for free in Story Creator.
Frequently Asked Questions
What is Flixly Story Creator?▾
Story Creator is Flixly's AI tool for making multi-scene episodes in anime or photorealistic live action. It writes a scene-by-scene script from a short story, keeps characters consistent with reference and identity sheets, renders a keyframe for each scene, animates the scenes with dialogue, and joins the clips into one episode.
Is Story Creator the same as Anime Creator?▾
Yes. Anime Creator was renamed Story Creator because it now makes photorealistic live-action series as well as anime. Your existing projects open in Story Creator, and old Anime Creator links redirect to it.
How do I keep characters consistent across scenes?▾
Give each character a short visual description, then lock a canonical image: a generated reference sheet in anime mode, or an approved image and its six-view identity sheet in live-action mode. Every keyframe is then drawn with that exact image, and you can redraw any single keyframe that drifts before you animate it.
Can the characters talk?▾
Yes. With generative speech the video model speaks the lines during the animation, which sounds natural but may change some words. With exact lines each line is voiced by text-to-speech in the character's voice and laid over the clip word for word. Story Creator does not use lip sync.
Is the script free?▾
Yes. Writing the script and the scene breakdown costs nothing. You pay for what you render: keyframes, animated shots and, in exact-lines mode, the voiced lines. The Episode estimate shows the cost of the whole episode before you start.
How long can an episode be?▾
Pick a 6-scene short draft, 30 seconds, 1, 2 or 3 minutes, or a custom runtime, and add more scenes later with Write more scenes. Each shot can be 5, 10 or 15 seconds, and the finished scenes are assembled into one video.
Can I make vertical videos for TikTok, Reels or Shorts?▾
Yes. Choose the vertical 9:16 format when you create the episode. Landscape 16:9 and square 1:1 are also available.