AI Virtual Try-On: Put Any Clothing Item on Any Person in About 30 Seconds
Upload a photo and a product shot, and Google's try-on model renders the person wearing it in about 30 seconds. No prompt, no booking, 13 credits.
TL;DR
Flixly's AI virtual try-on takes two images, a photo of a person and a product shot of a single piece of clothing, and renders that person wearing it in about 30 seconds. It runs Google's virtual try-on model and costs 13 credits, roughly 13 cents, per image. There is no prompt box and nothing to write. You upload two files, click once, and download the result.
TL;DR: Flixly's AI virtual try-on takes two images, a photo of a person and a product shot of a single piece of clothing, and renders that person wearing it in about 30 seconds. It runs Google's virtual try-on model and costs 13 credits, roughly 13 cents, per image. There is no prompt box and nothing to write. You upload two files, click once, and download the result.
You can't photograph a t-shirt that doesn't exist yet.
That's the trap under every clothing brand that ever tried to move fast. You need the sample before you can shoot it, you need the shot before you can list it, and you need the listing before anybody gives you a reason to have made the sample in the first place. Everyone in the chain is waiting on the person behind them.
So sellers do the expensive thing. Book the model, book the studio, shoot the entire range in a single day, and pray nothing in the line changes for six months.
Or they do the cheap thing, which is somehow worse. Paste the flatlay onto a stock photo, feather the edges, and hope nobody clicks to zoom.

AI virtual try-on is the third option, and it's now live on Flixly.
Two images. No prompt. That's the whole interface.
There is no prompt.
Not a short one. Not an optional one. There is nowhere to type at all. You give it a person, you give it one piece of clothing, and it gives you the person wearing it. That's the whole thing.

You can't prompt it into a different pose. You can't ask for the sleeves rolled up. You can't nudge the lighting. The upside is that you can't get it wrong either, and there's no head start for someone who's been writing prompts for two years. The two photos you feed it are the only variables that exist.
That constraint turns a creative tool into a utility.
Step 1: Upload the person
Left slot. A clear, front-facing photo of whoever's going to wear the thing.
Full body or half body both work. The model needs to find shoulders, torso and arms to map clothing onto, so anything that crops those out is going to disappoint you.
What to hand it:
- front-facing, squared to the camera
- shoulders and torso fully in frame
- arms not folded across the chest
- one person, not a group
- JPEG, PNG or WebP, under 10MB
The photo doesn't have to be a professional shot. A phone photo against a blank wall is fine. If you want the person to look like a catalog model afterwards, that's what AI Headshots is for: run that first, then bring the result here.
Step 2: Upload the clothing item
Right slot. One item, on its own, on a plain background.
A product shot is ideal, and by product shot I mean the boring kind. The piece laid flat or on an invisible mannequin, white or near-white behind it, no props, no hands, no folded-in-half-on-a-bed. The cleaner the cutout, the more of the real detail survives into the render.
One item per render, incidentally. The second slot takes a single piece, so a top, then trousers, then a jacket is not something you build in one pass.
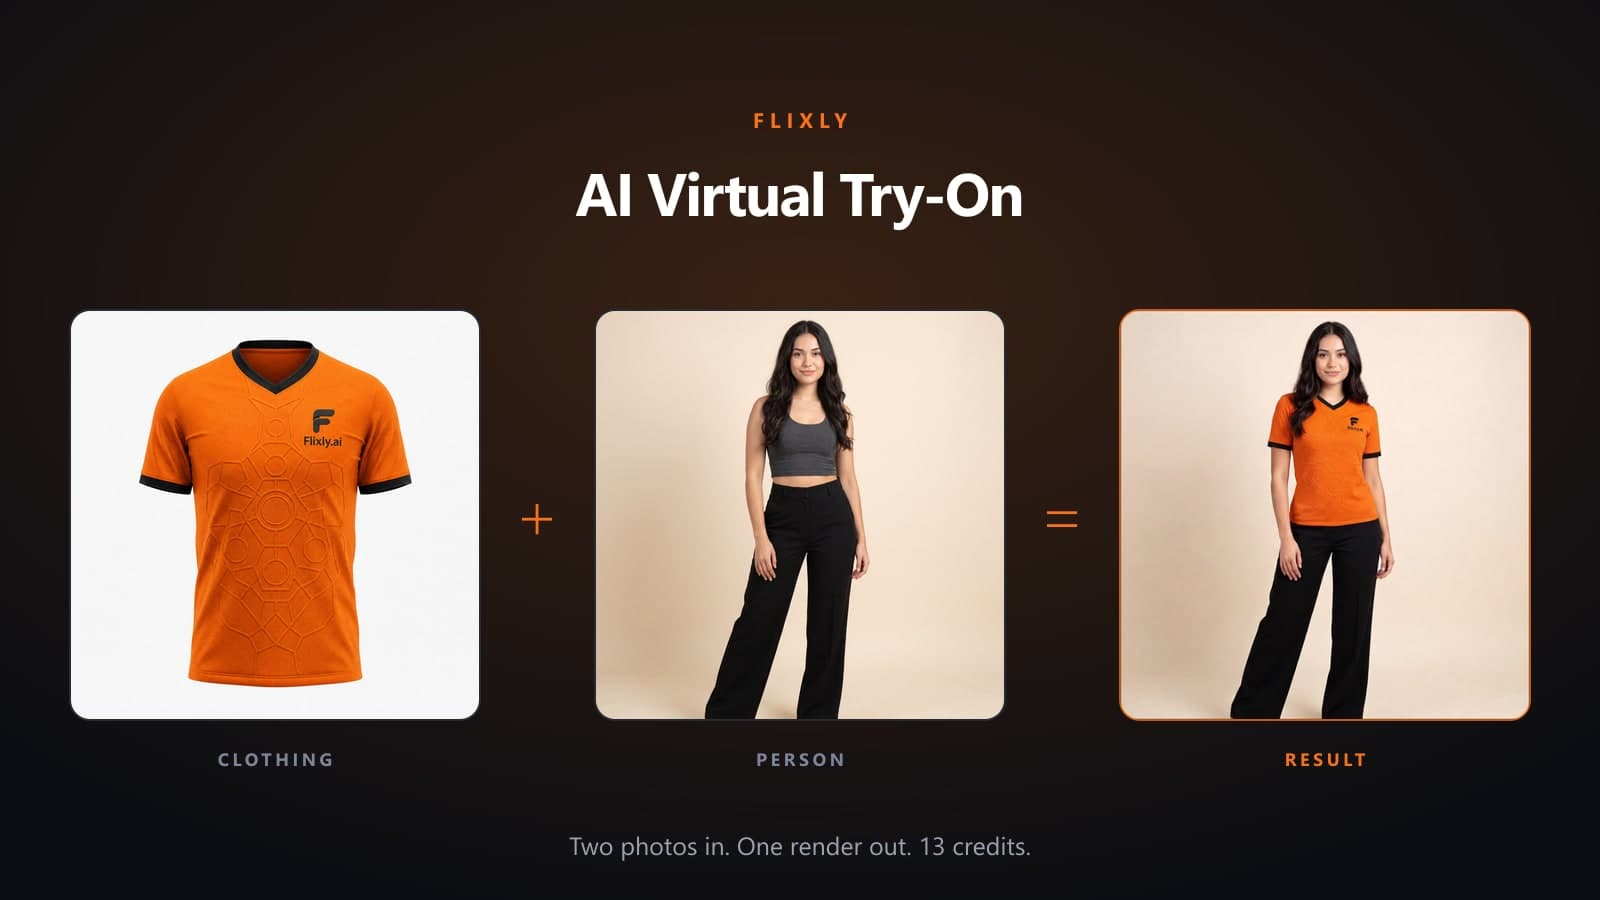
Print, texture and trim all carry through better than you'd expect. The orange jersey in this post went in as a flat product image with an embossed pattern across the chest and a Flixly.ai wordmark on it, and both came out the other side on the person, down to the black neck and cuff trim.
Not perfectly, though. Go back to the render at the top and look at the wordmark: it's still there, still roughly the right shape, and no longer quite readable. At listing-thumbnail size that's invisible. At full width it isn't.

If your product photos are shot on a busy background, clean them up before you upload. That's a separate job, and the platform has separate tools for it.
Step 3: Hit Try it on
The button sits at the bottom left, under the cost line. It stays disabled until both slots have finished uploading, so if it looks dead, one of your images is still in flight.
Then you wait about 30 seconds.
The status panel says "usually takes under a minute" and in practice that's honest. This is a still image, not video, so you're not sitting through the three to five minute renders that text to video asks for.
One request gives you one image. That's deliberate rather than stingy. The underlying model can emit up to four per call and bills per image, so exposing that knob would sell three renders at the price of one. One click, one image, one price.
Step 4: Download it, then run the next one
The result lands in the right panel with a Download button under it and the exact credit charge next to that.
Download gives you a PNG.
Then swap the right slot and go again. This is where the tool stops being a novelty and starts being useful, because the person image stays put while you cycle products through the second slot. Ten colorways of the same tee against the same model is ten clicks and about five minutes, and every one of them is framed identically. That's exactly what a product grid needs and exactly what a real photoshoot struggles to deliver.
Everything you generate is in your history afterwards, so you don't have to download as you go.
13 credits, and why that number changes what you'd try
Each render costs 13 credits. Credits list at a cent each, so call it 13 cents an image.
That number matters more than any quality comparison, because it changes what you're willing to attempt.
At photoshoot prices you shoot the winners. You pick the six SKUs you're confident about, you shoot those, and the long tail of your catalog goes up as a flatlay on a white background because nobody can justify a model day for a product that might sell eleven units.
At 13 cents you shoot everything.
You shoot the maybes. You shoot the variant you're not sure about. You shoot the same jacket on four different people because you genuinely don't know which one your customers see themselves in, and finding out costs you 52 cents instead of a booking fee.
Twenty renders is $2.60. A full 100-product catalog on a single model is $13.
Credits are the same currency across every tool on the platform, so the balance that funds this also funds video, voice and upscaling. Pack pricing is on the pricing page.

Get the inputs right and the rest takes care of itself
Almost every disappointing result traces back to one of two files, not to the model.
A person photo that's angled, cropped or cluttered.
Or a product photo shot on a busy background instead of a clean one.
Fix the input, not the expectation. And if you want the output at print size rather than listing size, treat it as a draft and run it through the image upscaler before anyone sees it at full width.
Who this is for
Clothing sellers with more SKUs than budget, first. Every product sitting there with a flatlay and no model shot is a listing losing conversions to a competitor who has one.
Print-on-demand sellers, second, and maybe harder. You have thousands of designs and zero physical inventory. You've never been able to photograph any of it, and mockup templates all look like mockup templates. This is a different answer, and it pairs directly with product mockup for the half of your catalog nobody wears. There's a full walkthrough of that tool if you haven't used it.
Dropshippers, because your supplier gave you the same six photos every other store selling that product is using. Now you have photos nobody else has.
Marketers testing creative. Four models, one product, four ad variants, 52 cents. Ship all four and let the data pick.
And anyone who just wants to see it first. Screenshot the product page, drop in a photo of yourself, find out whether the color works on you before it becomes a returns problem.
The tools worth pairing it with
Try-On is one step. The catalog is the rest of it.
- AI Headshots, to generate the model before you dress them, so you're not tied to whoever's photo you had lying around
- Product Mockup for mugs, bottles, packaging, everything that isn't worn
- Background Generator, to drop the finished try-on into a scene instead of leaving it on studio grey
- Image Upscaler, to take a listing thumbnail up to print size
- Landing Page Generator, the page those product images end up on
- Image Generator for lifestyle and campaign imagery around the product
Worth reading next: the e-commerce image generator roundup, and the image-to-image comparison if you want to know what else on the platform edits a photo you already have.
Everything above runs on the same credit balance. Browse the full set in tools, or see what the models can do in Explore.
Bringing it all together
The reason to care about this isn't that AI can now put a shirt on a person. It's that the cost of finding out dropped to 13 cents and about 30 seconds.
Which colorway to lead with. Which model. Whether that jacket photographs the way you think it does. Every one of those has been an argument until now, and every one of them is about to become something you settle by looking.
Stop shooting only the SKUs you're sure about.
Open Virtual Try-On, upload two photos, and go find out what the rest of your catalog looks like on a person.
Frequently Asked Questions
What is AI virtual try-on?▾
AI virtual try-on is software that renders a person wearing clothing they were never photographed in. You supply a photo of the person and a separate product image of the item, and the model composites them into a single realistic image. Flixly's version runs Google's virtual try-on model and needs no prompt or manual editing.
How much does virtual try-on cost per image on Flixly?▾
Each render costs 13 credits. Credits list at one cent each, so a single try-on image works out at roughly 13 cents. One request produces one image, and the exact charge is shown on the cost line before you generate and again under the finished result.
Do I need to write a prompt to use it?▾
No. The tool has no prompt field and there is nowhere to type. Your only inputs are the two images, the person photo and the product shot of the clothing. That means there is nothing to learn and no prompt-writing skill involved, but also no way to steer the result with words.
What kind of photos work best for virtual try-on?▾
For the person: a clear, front-facing shot with shoulders and torso in frame, arms not crossed, one subject only. Full body or half body both work. For the clothing: a product shot on a plain background, no props or hands. Clean, well-lit inputs matter far more than resolution.
How long does a virtual try-on render take?▾
About 30 seconds. The tool's own status panel says it usually finishes in under a minute, and that matches typical behavior. Because the output is a still image rather than video, it completes far faster than AI video generation, which generally runs several minutes per clip.
Can I try on a full outfit at once?▾
No. The second slot takes one piece of clothing per render, so a top, trousers and a jacket cannot be combined in a single pass. Run the tool once per item, or use a product photo that already shows the pieces styled together as a single shot.
What image formats and file sizes can I upload?▾
JPEG, PNG and WebP, up to 10MB per image. Both slots accept the same formats. Anything else is rejected before upload with a message naming the limit, so you find out immediately rather than after spending credits on a request that could never have worked.